1 - Server-Side
Introduction
Welcome to the Server-Side Development Guide for our platform!
This guide will walk you through building a complete module in our system using the Book Store example. Whether you're new to our stack or just need a refresher, we've got you covered!
You'll learn how to:
- ✅ Set up the module structure
- ✅ Implement CRUD operations (Create, Read, Update, Delete)
- ✅ Apply proper validations to ensure data integrity
- ✅ Support multi-tenancy so the system can handle multiple organizations smoothly
- ✅ Follow best practices for maintainable and scalable code
By the end of this guide, you'll have a fully functional module and a solid understanding of how server-side development works in our platform.
Start with Architecture part of the Architecture Guide to get a better understanding of the platform's architecture.
Prerequisites
Before starting module development, ensure you have:
- Access to the UW Platform solution
- SQL Server installed
- Entity Framework Core tools
- Required development environment setup
Creating the Book Module
Entity Creation
- Create the Book entity in the Domain layer (
UW.Platform.Domain.Entities):
public class Book : AuditableEntityBase, IMultiTenantEntity
{
    [MaxLength(StringLength.L50)]
    [Column(Order = 1)]
    public string Name { get; set; } = null!;
    [Column(Order = 2)]
    public BookTypeEnum Type { get; set; }
    [Column(Order = 3)]
    public DateTime PublishDate { get; set; }
    [Column(Order = 4)]
    public decimal Price { get; set; }
    [Column(Order = 5)]
    public int? TenantId { get; set; }
    public Tenant? Tenant { get; set; }
}
The [Column(Order = Number)] property is used to define the order of columns in the database table.
- Create the BookTypeEnum in
UW.Platform.Domain.Enums:
public enum BookTypeEnum
{
    [Description("Undefined")]
    Undefined,
    [Description("Adventure")]
    Adventure,
    [Description("Biography")]
    Biography,
    // ... other types
}
Database Configuration
- Add Book entity to
IAppDbContext:
public interface IAppDbContext
{
    public DbSet<Book> Books { get; set; }
    // ... other entities
}
- Add configuration to
AppDbContext:
public virtual DbSet<Book> Books { get; set; }
- Add entity configuration in
EntityConfigurations(optional):
public class BookConfiguration : IEntityTypeConfiguration<Book>
{
    public void Configure(EntityTypeBuilder<Book> builder)
    {
        builder.HasIndex(x => x.Name)
            .IsUnique(false);
    }
}
- Open Terminal and Create and apply migration:
dotnet ef migrations add Create_Book_Entity --context AppDbContext --project src\UW.Platform.Migrator --startup-project src\UW.Platform.Migrator --output-dir Data\AppDb
You can check Batches in etc/batches/Run-Migrations.bat to run migrations automatically or run the next command.
- Update database:
dotnet ef database update --context AppDbContext --project src\UW.Platform.Migrator --startup-project src\UW.Platform.Migrator
Permission Setup Guide
This guide outlines the steps required to set up new permissions for your project.
1. Add permissions to TenantPermissions.cs
public static class TenantPermissions
{
    public static class Books
    {
        public const string Default = $"{GroupName}.Books";

        public const string Add = $"{Default}.Create";

        public const string Update = $"{Default}.Update";

        public const string Delete = $"{Default}.Delete";
    }
}
2. Update JSON Files for Seeding
The seeder depends on JSON files. To add new permissions, you need to update the following JSON files in the UW.Platform.Migrator.Seeders.AppDb.InitialData directory:
Important Notes:
- For any JSON file you modify, change its "Copy to Output Directory" property to "Copy always" in the Properties Window (Alt + Enter)
- After modifying JSON files, rebuild the migrator project
- Run the batch file in
etc/batches/Run-Migrations.batto apply the seeding data - Don't forget commas between JSON objects - missing commas will result in empty tables
a. Update PermissionGroups.json
Add a new permission group:
{
  "Id": 44,
  "Name": "Book Management",
  "PermissionType": 2
}
Note: PermissionType values:
- 1 = Host
- 2 = Tenant
b. Update Permissions.json
Add new permissions:
{
  "Id": 3351,
  "Key": "T.Books",
  "Name": "Read Books list and details",
  "PermissionType": "Tenant",
  "PermissionGroupId": 44
},
{
  "Id": 3352,
  "Key": "T.Books.Add",
  "Name": "Add Books",
  "PermissionType": "Tenant",
  "PermissionGroupId": 44
},
{
  "Id": 3353,
  "Key": "T.Books.Update",
  "Name": "Update Books",
  "PermissionType": "Tenant",
  "PermissionGroupId": 44
},
{
  "Id": 3354,
  "Key": "T.Books.Delete",
  "Name": "Delete Books",
  "PermissionType": "Tenant",
  "PermissionGroupId": 44
}
The CustomIdentity attribute is used to assign a unique identifier to each permission. Host permissions are assigned 1000 and tenant permissions are assigned 2000 and above.
Increment The CustomIdentity by 100 for each new permission.
c. Update Roles.json
Add a new role:
{
  "Id": 21,
  "Name": "books app",
  "NormalizedName": "BOOKS APP",
  "DisplayName": "Books Application",
  "Description": "Books Application",
  "RoleType": "Tenant"
}
d. Update RolePermissions.json
Map the new role to its permissions:
{
  "Id": 144,
  "RoleId": 21,
  "PermissionId": 3351
},
{
  "Id": 145,
  "RoleId": 21,
  "PermissionId": 3352
},
{
  "Id": 146,
  "RoleId": 21,
  "PermissionId": 3353
},
{
  "Id": 147,
  "RoleId": 21,
  "PermissionId": 3354
}
3. Apply Changes
After updating all JSON files:
- Make sure all modified JSON files have "Copy to Output Directory" set to "Copy always"
- Rebuild the migrator project
- Run
etc/batches/Run-Migrations.batto apply the seeding data - After seeding is complete, remember to return the 'Copy to Output Directory' property back to its original setting in all JSON files
Adding Feature to System
- Update
AppFeatures.cs:
We have integrated this module into the system's feature list, allowing it to be treated as an optional feature. This enables tenants to subscribe to the module if they wish to include it in their platform.
[CustomIdentity((int)FeatureEnum.Books)] is used to assign a unique identifier to each feature by the number that we have assigned to the enum feature next.
public static class AppFeatures
{
    [CustomIdentity((int)FeatureEnum.Books)]
    [CustomDisplayName("Books Feature")]
    [Description("Books Feature")]
    [FeatureLimits(LimitTypeEnum.NoLimits, 0, "")]
    public const string Books = "Books";
}
Make sure to add the new feature to the FeatureEnum enum and assign a unique identifier to it to avoid conflicts with existing features.
- Update enum in
FeatureEnum
public enum FeatureEnum
{
    Sms = 1,
    Contacts = 2,
    Whatsapp = 3,
    ....
    Books = 4, // Added for Books with unique id `4`
}
Update JSON Files for Feature Seeding
Similar to the permissions setup, you need to update the JSON files for features. These files are also located in the UW.Platform.Migrator.Seeders.AppDb.InitialData directory:
Important Notes:
- For any JSON file you modify, change its "Copy to Output Directory" property to "Copy always" in the Properties Window (Alt + Enter)
- After modifying JSON files, rebuild the migrator project
- Run the batch file in
etc/batches/Run-Migrations.batto apply the seeding data - Don't forget commas between JSON objects - missing commas will result in empty tables
a. Update Features.json
Add the new feature:
{
  "Id": 25,
  "Key": "Books",
  "Name": "Books Feature",
  "Description": "Books Feature",
  "LimitType": 1,
  "MaxPlanLimitValue": 0,
  "LimitUnit": "",
  "IsActive": true,
  "FeatureGroupId": null,
  "SortOrder": 25
}
b. Update FeatureRoles.json
Map the new feature to the role:
{
  "Id": 19,
  "RoleId": 21,
  "FeatureId": 25
}
Apply Changes
After updating all JSON files:
- Make sure all modified JSON files have "Copy to Output Directory" set to "Copy always"
- Rebuild the migrator project
- Run
etc/batches/Run-Migrations.batto apply the seeding data - After seeding is complete, remember to return the 'Copy to Output Directory' property back to its original setting in all JSON files
The feature will not be displayed to tenants automatically! You must:
- Add subscriptions for the new feature in the Host
- Add pricing for the feature from the Features screen
- Assign the feature to tenants that need to use it
Without completing these steps, tenants won't be able to access the Books feature even if all code and permissions are properly set up.
API Endpoints
Create the following endpoint structure in UW.Platform.TenantApi.UseCases:
Book/
├── CreateBook/
│   ├── Endpoint.cs
│   ├── Handler.cs
│   ├── Mapper.cs
│   └── Validator.cs
├── GetBook/
│   ├── Endpoint.cs
│   └── Handler.cs
├── GetBookList/
│   ├── Endpoint.cs
│   └── Handler.cs
├── UpdateBook/
│   ├── Endpoint.cs
│   ├── Handler.cs
│   └── Validator.cs
└── DeleteBook/
    ├── Endpoint.cs
    └── Handler.cs
Example implementation for CreateBook endpoint:
EndpointClass:- Handles POST /books requests.
- Requires Books.Add permission.
- Checks if the Books feature is enabled for the tenant.
HandleAsyncMethod:- Processes the request via handler.
- Encrypts and sends the response asynchronously.
RequestClass:- Contains book details: Name, Type, PublishDate, and Price.
- Implements IEncryptedDto for encryption compliance. You can check FastEndpoints Documentationlink for get familiar.
- Endpoint.cs:
public class Endpoint(Handler handler) : Endpoint<Request, string>
{
    public override void Configure()
    {
        Post("books");
        Permissions(TenantPermissions.Books.Add);
        this.CheckFeatureLimitPreprocessor(AppFeatures.Books);
    }

    public override async Task HandleAsync(Request req, CancellationToken ct)
    {
        var response = await handler.HandleAsync(req, ct);

        await SendAsync(Utils.Encrypt(response), cancellation: ct);
    }
}
public class Request : IEncryptedDto
{
    public string Name { get; set; } = null!;

    public string Type { get; set; } = null!;

    public DateTime PublishDate { get; set; }

    public decimal Price { get; set; }
}
- Handler.cs:
public class Handler(
    IAppDbContext dbContext,
    Mapper mapper,
    IApplicationInfo applicationInfo,
    IStringLocalizer<Handler> l) : IScopedHandler
{
    public async Task<int> HandleAsync(Request req, CancellationToken ct = default)
    {
        var tenantId = applicationInfo.TenantInfo!.Id;

        var validation = ValidationContext.Instance;
        var type = Enum.TryParse<BookTypeEnum>(req.Type, out var validType);
        if (!type)
            validation.ThrowError(l["ErrorMessage.InvalidBookType"]);

        var book = mapper.ToEntity(req);
        book.Type = validType;

        dbContext.Books.Add(book);
        await dbContext.SaveChangesAsync(ct);

        await EventHelper.CreateTenantFeatureConsumedEvent(FeatureEnum.Books, tenantId).PublishAsync(cancellation: ct);
        return book.Id;
    }
}
- Mapper.cs:
public class Mapper : RequestMapper<Request, Domain.Entities.Book>
{
    public override Domain.Entities.Book ToEntity(Request e)
    {
        return new Domain.Entities.Book()
        {
            Name = e.Name,
            Price = e.Price,
            PublishDate = e.PublishDate
        };
    }
}
- Validator.cs:
public class Validator : Validator<Request>
{
    public Validator()
    {
        RuleFor(x => x.Name)
            .MaximumLength((StringLength.L50))
            .NotNull();

        RuleFor(x => x.Price)
            .NotNull();

        RuleFor(x => x.Type)
            .NotNull();
    }
}
Localization
Add localizations in UW.Platform.TenantApi.Localizations:
- ar.json:
{
  "ErrorMessage.BookNotExist": "الكتاب غير موجودة",
  "ErrorMessage.InvalidBookType": "خطأ بنوع الكتاب"
}
- en.json:
{
  "ErrorMessage.BookNotExist": "Book Not Exist",
  "ErrorMessage.InvalidBookType": "Invalid Book Type"
}
Testing (Optional)
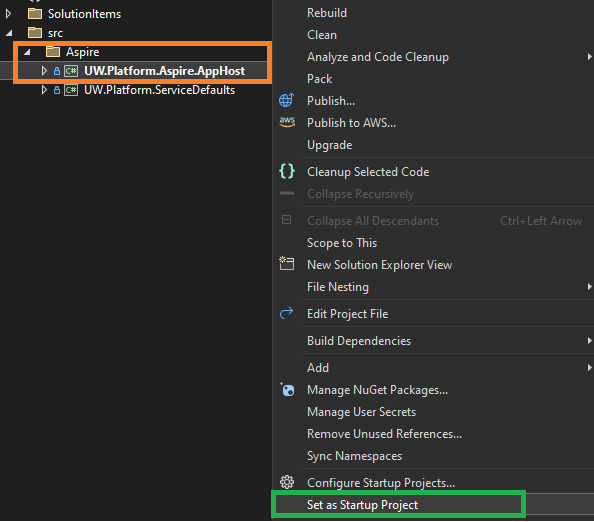
- Option 1:
Aspire-Based Deployment:
- Configure Aspire as the startup project in your development environment
- Aspire is Microsoft's new cloud-ready application platform that offers several key advantages:
- Unified orchestration of distributed applications
- Built-in service discovery and configuration management
- Integrated monitoring and diagnostics
- Simplified local development experience
- Cloud-native deployment readiness
- Aspire is Microsoft's new cloud-ready application platform that offers several key advantages:
- Option 2:
Traditional Web API Deployment:
- Make TenantApi Project as startup Project and run it separately But this way be running with Identity Server so you need to run it also to get the token.
Testing Steps:
- Make Aspire as Startup Project:
- Lunch the application:
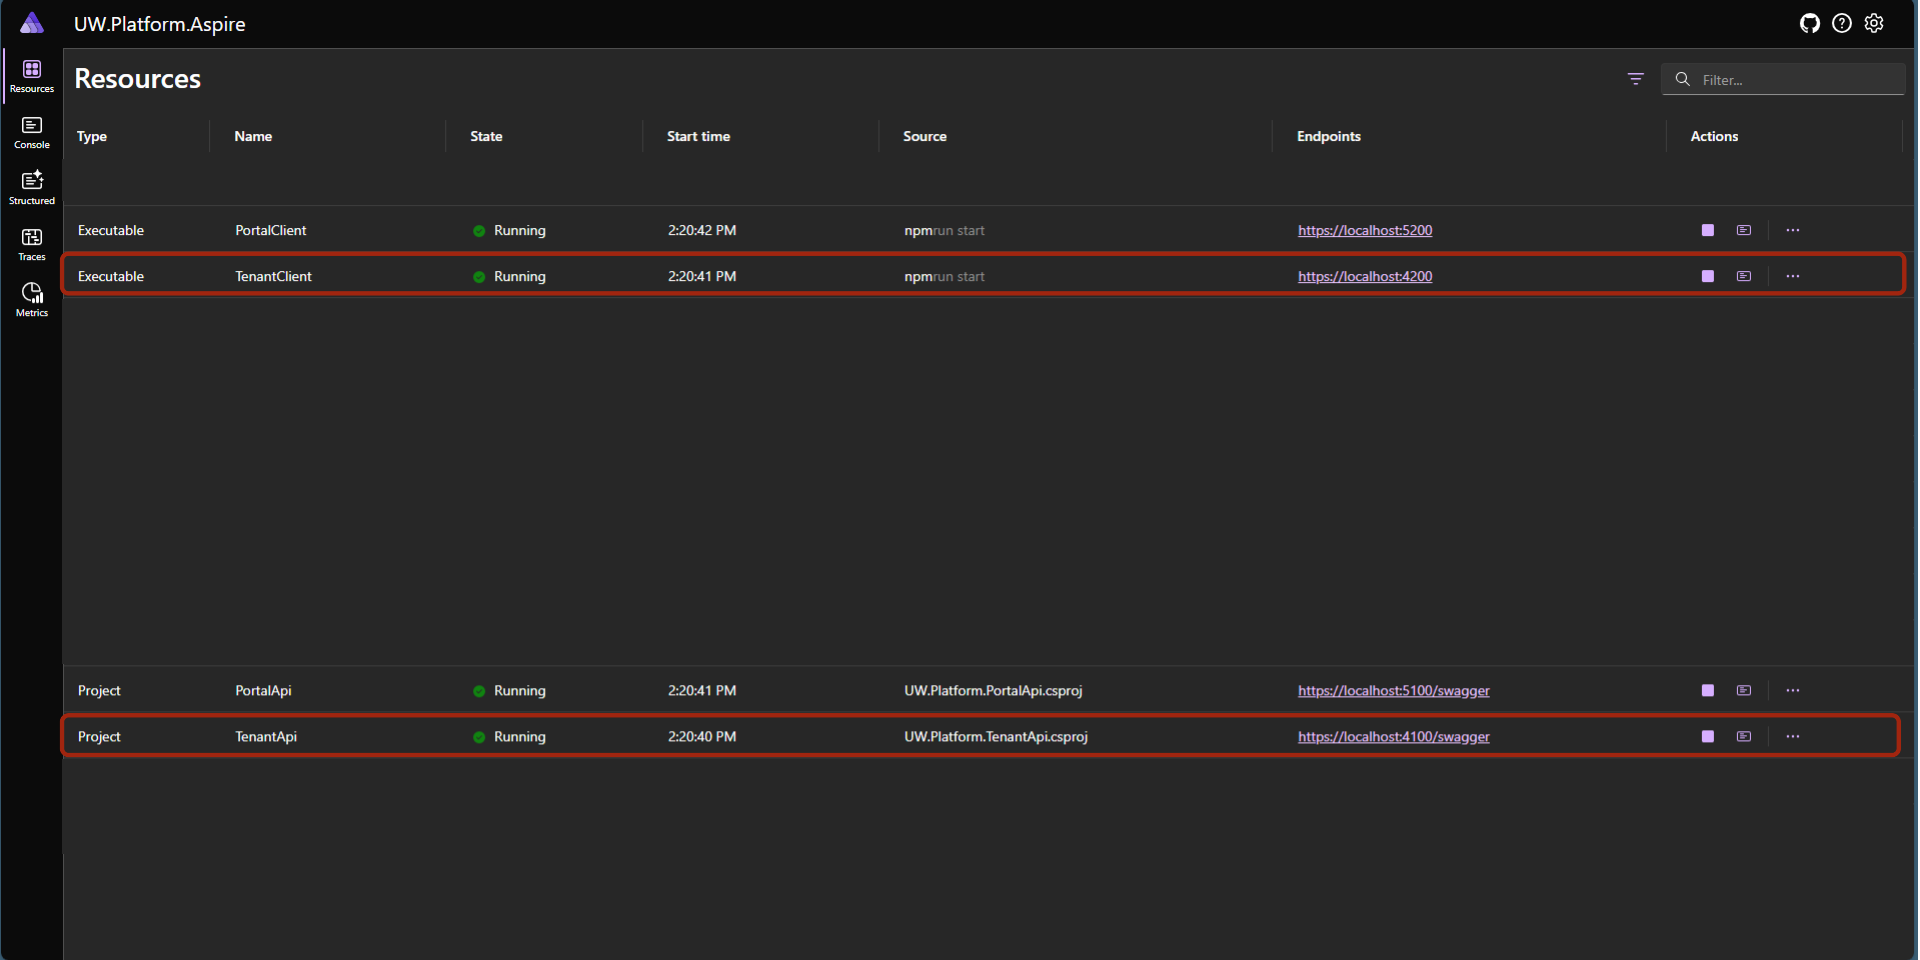
- Click in Tenant Client Project
https://localhost:4200
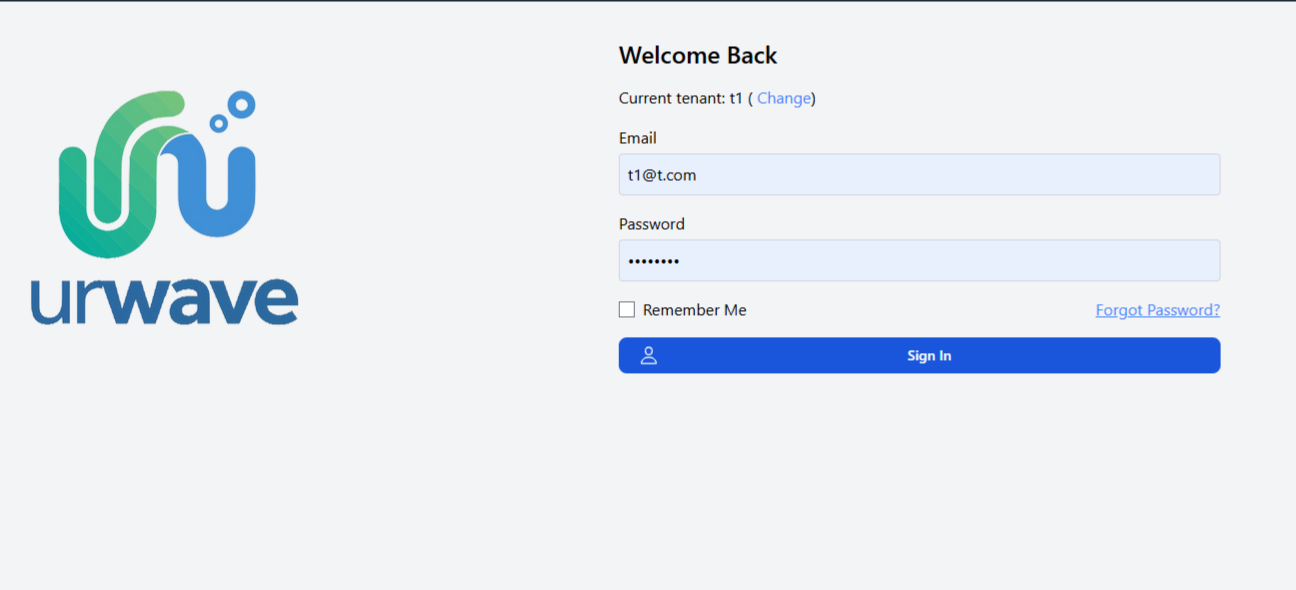
- Select the Current tenant as
t1 - Email:
[email protected] - Password:
P@ssw0rd
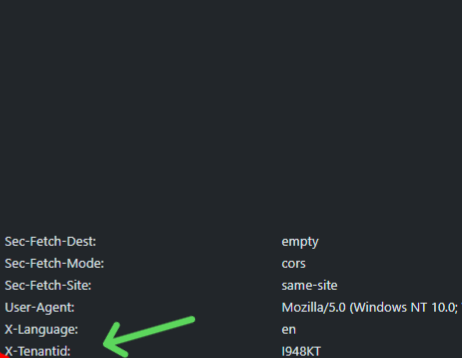
- Open Developer Tools and go to Network tab and go to any page and check the response:
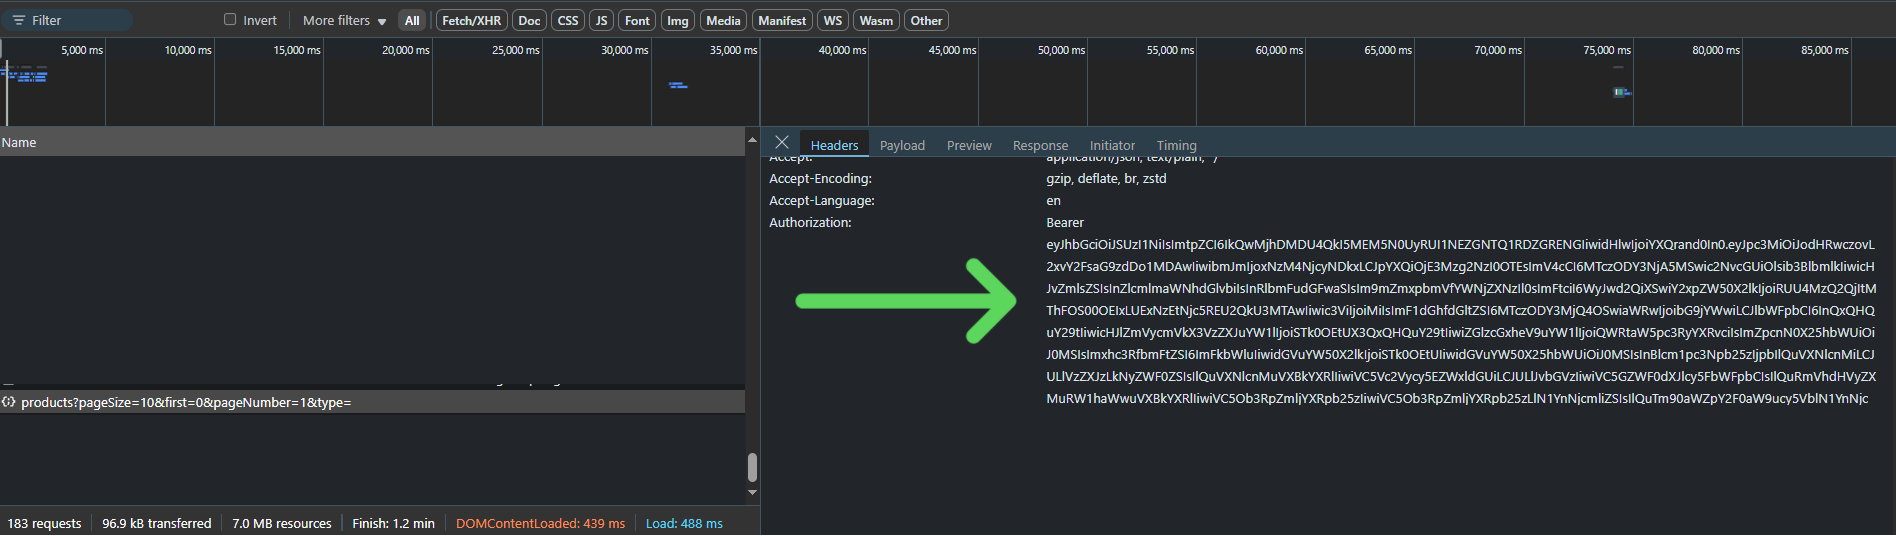
- Copy the token and scroll down you will see X-TenantId Header copy it also we will need it in postman:
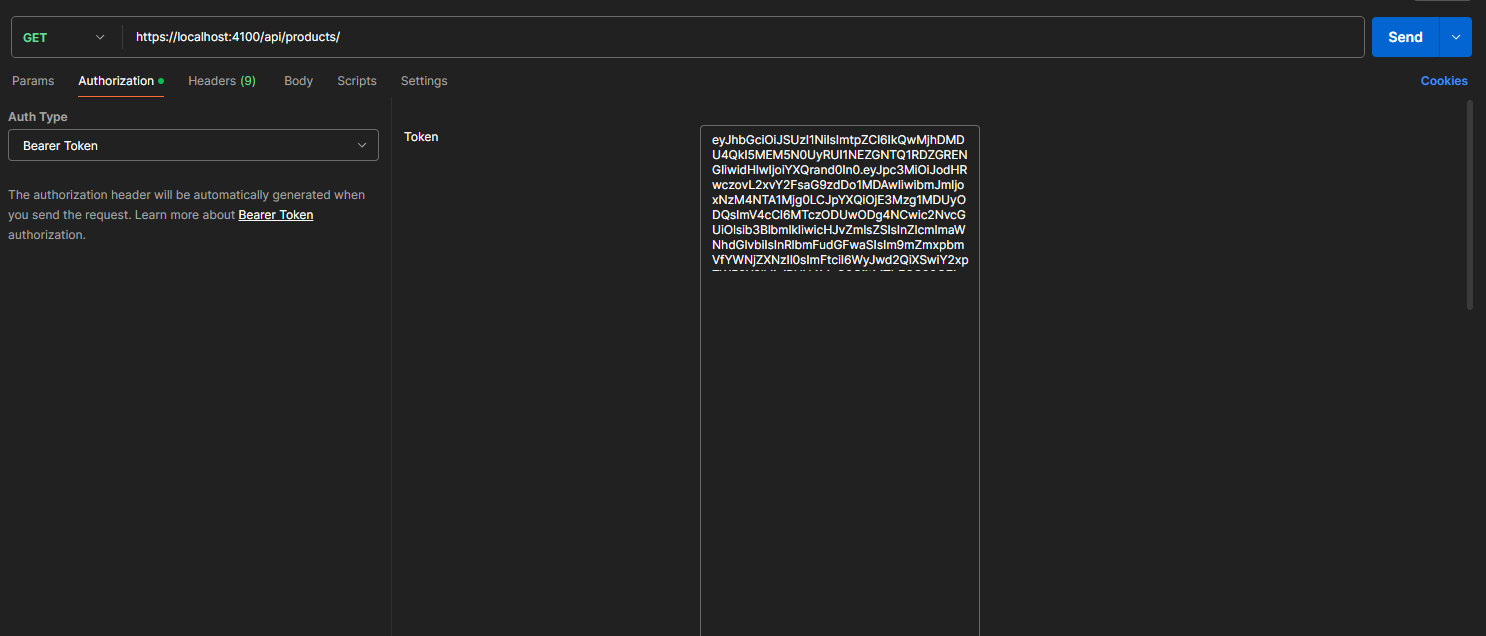
- Open Postman and create a new request and paste the token in Authorization tab
Bearer Token:
- open Header tab and paste the X-TenantId Header:
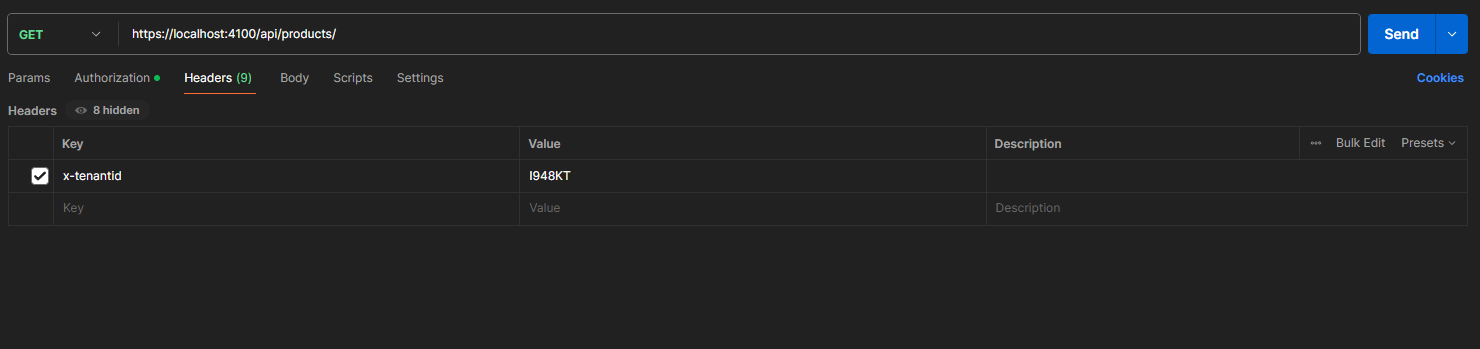
- click on send and you will see the response:
